When I left off last time they had poured the slab for my new garage, that was late August. the mason was back the first week of Sept to lay a course of block around the perimeter. The garage will be built atop this course of block.
Setting the blocks.
Next in the process was getting the materials delivered.
All the materials for this build came from ABC supply out of hayward WI. It may of cost a little more than say Menards but the quality of the lumber was outstanding, not a bad piece of lumber in the whole project.
Let's start building.
Bill getting the treated sill plate fastened down to the blocks.
Next was to get the walls laid out.
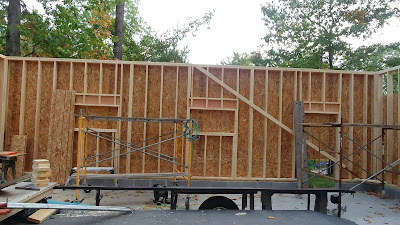
The walls were built in sections instead of one piece.
Wall sections were built on the trailer, it saves on the back, not having to bend over so much, smart idea in my book. There are 3 sections for the north wall ready for erection on the trailer plus preassembled corners visible on the trailer ramp.
The finished ouside dimensions will be 30X34 feet with 10 foot sidewalls using 2x6 lumber, much stronger than 2X4's and better insulating potential. I plan on heating it at some point. The overhead door is 8X16 feet and insulated.
They were able to get it framed up in about 1 day.
Next was to get the outside covered with 1/2" OSB. Notice the sheeting pattern on the ends. This is so they can tie in the end trusses to the walls for more rigidity. Then it was time to set the roof trusses.
Brought in a crane to set the roof trusses in place which went really quick. Everbody knew there job, bing, bang, boom and that part was done.The cost of the crane was more than made up for in the time and labor savings as opposed to manually lifting and setting them.
Next was to finish the sheeting on the ends to tie the roof trusses to the stud walls.
Next was to add the roof.
Looks like a bonafide garage now.
Time to cut out the windows and service door. They were sheeted over initially.Next step was to Tyvek the whole garage.
Since I plan on heating the stucture I had to check and follow the code. This entailed putting down poly under the slab. Also they require 2 inch thick foam 2 feet down vertically and 2 feet out.
Getting the foam in place. Bill then bent and installed aluminum over the foam. This will be backfilled to about 4 inches from the top.
Next step was to cover the Tyvek with LP Smartboard. It comes primed and will be painted in the spring.
Almost there. When I made the deal for the build in the spring the builder said he was pretty much booked for the year and my reply was just get me a cold storage building before the snow flys.
First snow was Nov 4th and I have my cold storage building and it's beautiful.
Electrical is next. The snow didn't stay and on the 7th the electrician showed up to trench in the electric from the house to the new building. I also had them trench a line down to the lake so now I will have power dockside, a real plus. It was really a no brainer. It cost 350 dollars for him to show up with the trenching equipment and $1.50 per foot of trenching. It was 85 feet to the garage and 150 feet to the lakeside location.
They used a small backhoe next to the buildings but then used a vibrating knife style blade that also laid the electrical wires in one operation, very slick. the ground was froze down about 3-4 inches already. This was not much of an issue once they got thru it initially. After that it was like a hot knife thru butter with the vibrating knife style trencher.
That's were we stand with the build. The electrical is trenched in but no hookups yet, that will be coming in the near future.
That's all for now.


No comments:
Post a Comment